Here’s my presentation in pdf format.
Category Archives: windows 10
Credential Guard Made Easy for Windows 10 Enterprise Version 1607
Those who had familiarized themselves with Credential Guard in Windows 10 prior to the Anniversary, i.e. version 1607, Update may have found that the ways to enable and configuring the feature seem have changed sine the release. Indeed, there are a few discrepancies in UI and hence operations between 1607 and 1511. And they are for the better actually. It is now easier and simpler to assess the readiness and configure Credential Guard.
![]() For those who are new to Device Guard and Credential Guard, it is important to have some technical background and knowledge of specific hardware and software requirements. So when it comes to hardware or software refresh, you can plan accordingly. Here is a must read documentation, Protect derived domain credentials with Credential Guard. And do take time to survey and inventory your environment, if not already. Assess what you have and how devices are being used, and identify business needs and candidates for employing Credential Guard. Do set up a sandbox environment to test the settings and make sure you have established recoverability before approaching to your production devices.
For those who are new to Device Guard and Credential Guard, it is important to have some technical background and knowledge of specific hardware and software requirements. So when it comes to hardware or software refresh, you can plan accordingly. Here is a must read documentation, Protect derived domain credentials with Credential Guard. And do take time to survey and inventory your environment, if not already. Assess what you have and how devices are being used, and identify business needs and candidates for employing Credential Guard. Do set up a sandbox environment to test the settings and make sure you have established recoverability before approaching to your production devices.
Going forward, to assess and configure Credential Guard, just:
- Download and extract Device Guard and Credential Guard hardware readiness tool. This tool is designed to work with high accuracy on Windows 10, version 1607, in addition will also work on Windows 10, versions 1507 and 1511.
- In an admin command prompt, run the tool with an intended switch/parameter as explained in the readme file. By default, a log is created at C:\DGLogs.
The following is a sample session where I ran the tool in an admin command prompt with a “–ready” switch to assess the readiness of the local system for Device Guard/Credential Guard. I however had to first relax the PowerShell execution policy to “unrestricted” for the tool which is not digitally signed to run under my device’s current script execution policy set to “RemoteSigned.”
Note that the cmdlet, Set-ExecutionpPolicy, is scoped to LocalMachine as the default. Running Set-ExecutionPolicy without specifying the scope will also change the default execution policy of the local machine. To avoid inadvertently changing this security measure, a common practice is to ALWAYS run Set-ExecutionPolicy with the “-scope” parameter to explicitly and specifically define the impact of a to be introduced change in script execution policy. Here I set the scope to “process”, the execution policy was dynamically set to “Unrestricted” during the execution so the tool could run, and reset to “RemoteSigned” once having finished the process, as confirmed by the output of a following Get-ExecutionPolicy. In the sample session, my Windows 10 Enterprise device had been already configured and running Credential Guard, as indicated in the output, however my device was not configured with a Hardware Code Integrity policy which is a great feature of Device Guard, the other landmark security feature of Windows 10 Enterprise.
The same as before, once Credential Guard is properly configured, up and running, you should find in Task Manager the ‘Credential Guard’ process and ‘lsaiso.exe’ listed in the Details page as below.
And ultimately integrate this tool with your deployment and configuration management processes to assess the readiness, configure and manage Credential Guard for Windows 10 Enterprise devices in a managed environment. And that’s when no more long nights for configuring and troubleshooting a Credential Guard roll-out.
An Introduction of Windows 10 Credential Guard
Windows 10 Enterprise has introduced a set of new security features including Credential Guard which is a key for securing derived credentials and defend ‘credential theft and reuse’ attacks like Pass-the-Hash (PtH) and Pass-the-Ticket. This article is to provide a technical background and highlights how Credential Guard works. A good reference titled “Protect derived domain credentials with Credential Guard” is also available in Microsoft TechNet Library. Note that Credential Guard is technically part of Device Guard to be detailed in an upcoming article.
LSASS, a Known Secret Service in Windows
Credential Guard is to secure the data kept by Local Security Authority (LSA) Subsystem Service (LSASS) which is a privileged process in Windows and for:
- Validating users for local and remote sign-ins
- Enforcing local security policies
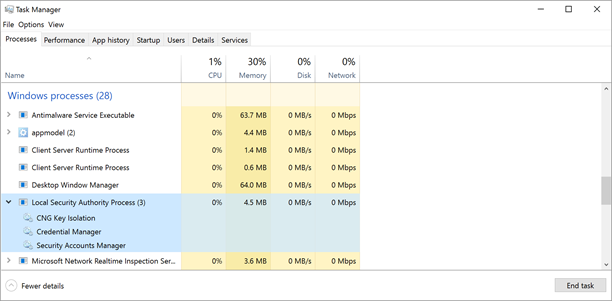
And on an Active Directory domain controller, LSASS is also responsible for providing Active Directory database lookups, authentication, and replication. The following illustrates an instance of Windows 10 running OS Build 10586, while the desktop Task Manager reported the status of LSASS. Also hereafter, unless stated otherwise, LSA and LSASS are used interchangeably.
The above shows the Task Manager reporting LSASS.exe running in a Windows 10 Enterprise desktop prior to enabling Credential Guard.
The Secret Service’s Secrets
Those secrets for authenticating requests on behalf of users are hashes and Ticket Granting Tickets (TGTs) which the secret service protects. In this article, the focus is on a hash, while much of the information is applicable to TGTs as well.
Hash
The term, hash (or a password hash, a hash value), in the context of computer security is a derived credential, namely an encrypted form of a user’s plain text password. During a session, a protected resource upon being initially accessed by a user will first try to authenticate the user. And upon a successful authentication, the process then authorizes the request based on access rights granted to the user and those security groups the user is a member of for this resource. In Windows security model, a password is never stored in plain text, instead it first goes through a hash function, and the resulting hash value is what LSA stores for reuse in a subsequent authentication request. A password hash can be stored in one of four forms: LAN Manager (LM), NT, AES key, or Digest. Although over the years, recent versions of Windows do not store LM and NT hashes anymore, however for backward compatibility some out-dated applications may still cause which to be stored. Windows security model stores hashes in one of the two places:
- a local Security Accounts Manager (SAM) database
- a networked Active Directory database, as applicable, namely the NTDS.DIT of a domain controller
LSA Secrets
And based on the supported authentication protocols and methods of the OS, LSA loads corresponding authentication packages which know how to realize a particular hash. And as mentioned, there may be various hashes which LSA stores in an encrypted forms in the local device registry for various usage scenarios and backward supportability. These stored hashes and other security artifacts like TGTs are collectively referred as LSA secrets.
There is normally a time-to-live element associated with a hash. And before a stored hash expired, LSA can and will reuse it upon an authentication request, instead of repeatedly prompting the user for credentials, hence provide an SSO experience to the user. Detailed description of authentication artifacts and processes are beyond the scope of this article and available elsewhere.
Recently, SSO has become a crucial component for a baseline criteria for user experience and adopting an application. And as malware becomes increasingly sophisticated, LSA secrets have become targets for identity theft and reuse attacks with stealth.
Pass-the-Hash (PtH) Attack
Once a user is authenticated, depending on the scenarios, there are multiple forms of a hash, i.e. LSA secrets, stored in LSASS process memory on a user’s behalf. And there are also tools including PowerShell to extract them. A password hash is stored for subsequent authentication needs including storage access, network transmission, etc. for this user, rather than to repeatedly prompt the user for the password again during a session. This is significant for implementing SSO, at the same tim for identity theft and reuse as well.
What makes a hash an interesting hacking target is a stored hash represents an already authenticated user. Additionally, a hash can roam within a network for remote access. And by passing a hash when accessing a remote resource, an authentication process can proceed without the need to have the user whose password previously generated the hash aware of. Such that this attack can allow a hacker to traverse a network, infect the next note and look for higher value accounts. And repeat the process to eventually acquire an account with domain administrator rights to ultimately own the associated Active Directory domain. Notice that Accessing LSA secrets does require a local administrator-level access.
Conceptually, a PtH attack is to first hack a local administrator-level account for accessing LSA secrets, i.e. stored hashes, then impersonates a user by presenting the user’s hash for accessing a remote resource without the need to involve the user at all. Notice that from an OS point of view there is no difference if a hash is presented on behalf of a legitimate user or a hacker via unauthorized access. This is why a PtH attack is effective, hard to detect and an imminent threat to an entire network.
Ultimately, an unauthorized access to LSA secrets including password hashes and TGTs can lead to the so called PtH and Pass-the-Ticket (PtT) attacks, respectively. And accessing LSA secrets is a privileged operation and requires local administrator rights. In other words, to conduct a PtH attack a hacker must first hack/phish an account with local administrator rights.
Assume Breach Security Model
So to conduct PtH or PtT, a hacker will need to first acquire local administrator access. And it seems one logical and essential defense is to focus on protecting the credential of a local administrator account. This is a right approach, however not an effective way. Statistics has shown that many users uses the same password for accessing multiple sites, potentially corporate and external sites. With a rootkit which can be installed by a careless click on a phishing email, malware can potentially be loaded before OS code upon forcing a reboot and compromise a device at a boot time. Anti-virus, encryption, real-time monitoring, etc. are all based on a presumption that hardware and the loaded OS are trustworthy. This is apparently not necessarily always the case.
Today, with hundreds of thousands, yes, hundreds of thousands new malware everyday and the alarming infection rate which we have learned from the past, in addition to Advanced Persistent Threats (APTs) are on the rise, ensuring a device and its OS maintain a pristine state from power on to off is critical. IT has quickly learned in the past few years from some high profile breaches that getting hacked is a reality and highly likely once targeted. And a new normal for IT has become “You have been hacked, you just don’t know it yet.”
In other words, IT needs to essentially assume breach, and take a serious look on how to prevent PtH attacks in this setting. And the first has to be ensuring the hardware and the platform (i.e. OS runtime) are trustworthy.
First, Hardware Boot Integrity and OS Code Integrity
I put these two together since from a user’s point of view both seem appearing as one start-up process once powering on a device. By the time a user sees the welcome or logon screen and types in a user ID and a password, the OS has been loaded and the system processes are auto-started, delayed or stopped per associated configurations. An important presumption for security measures to work after a device starts has always been that collectively the hardware (i.e. firmware) is loaded without being tempered, the OS code is loaded without being altered and all defined processes are set as designed. In other words, for all the security measures like antivirus, security policies, etc. engaged or imposed after a device is booted to be effective, the device must maintain both hardware and platform integrity. So the runtime environment is trustworthy and with predictable behaviors to possibly monitor identify and detect malware.
Windows 10 Device Guard employs UEFI 2.3.1 secure boot and a number of measures to ensure boot integrity and OS code integrity. This is to be detailed in upcoming post and beyond the scope of this article. Here, the point is that a meaningful discussion of protecting hash values and defending PtH attacks must be based on a device with trusted firmware and OS code.
Protecting Derived Credentials (Hashes)
![]() The introduction of Credential Guard in Windows 10 Enterprise edition offers a new approach to increase the security of derived credentials, i.e. password hashes and Kerberos TGTs, with virtualization-based securities to mitigate PtH and PtT attacks. There are various editions in Windows 10 for home, business and education users. Notice that Credential Guard is to better secure credentials in a managed and networked environment and does require Windows 10 Enterprise or Education edition.
The introduction of Credential Guard in Windows 10 Enterprise edition offers a new approach to increase the security of derived credentials, i.e. password hashes and Kerberos TGTs, with virtualization-based securities to mitigate PtH and PtT attacks. There are various editions in Windows 10 for home, business and education users. Notice that Credential Guard is to better secure credentials in a managed and networked environment and does require Windows 10 Enterprise or Education edition.
Windows 10 Credential Guard Architecture
Credential Guard uses Virtualization-Based Security (VBS) to isolate secrets so that only privileged system software can access them. The following illustrates a conceptual model. There are particular hardware and configuration requirements as shown. Specifically, UEFI 2.3.1 or later is required and has a different disk partitions with those of BIOS. IT needs to plan the deployment of UEFI to those devices accordingly for employing Credential Guard.
Prior to Windows 10, all derived credentials are kept by LSA. The danger is that upon successfully compromising LSA, a hacker can get full access to LSA secrets. In Windows 10, the LSA is moved into a separate container serving as a VBS environment and runs as LSAIso. Windows 10 marks the first version of Windows to leverage hardware to create an area of high isolation. This makes it impossible for hackers to steal derived credentials. Let’s take a deeper look of VBS.
Enabling Credential Guard
In a Windows 10 Enterprise device, with UEFI Secure Boot and the hardware assisted virtualization turned on in the boot configuration, the settings are in the policy, as shown below.
VBS requires Secure Boot, and can optionally be enabled with the use of DMA Protections, as illustrated below. DMA protection requires hardware support and will only be enabled on correctly configured devices. On Code Integrity setting, this enables VBS to protect and ensure the integrity of Kernel Mode.
With Windows 10 Version 1511, Credential Guard now has an UEFI lock setting. IT should test the setting against management scenarios to ensure supportability. Once Credential Guard is enabled, after a reboot LSAIso.exe should run and appear in Task Manager, as shown below.
Concept of Virtualization-Based Security
With Credential Guard, the local LSASS now works with LSAIso, a new and isolated LSA process that runs, stores and protects in a virtualized, i.e. isolated, environment within the same device. Notice that LSAIso does not host any device drivers, but a small subset of OS binaries that are needed for security. All of these binaries are signed with a certificate that is trusted by VBS and these signatures are validated before launching the file in the protected environment. These measures make Windows 10 virtualization-based security highly secure with minimal attack surface.
Remote Procedure Call
When processing a hash, LSA issues RPC to LSAIso. RPC, a program communication model introduced in 1984, offers a mechanism allowing a program in one device to make a procedure call to a program/procedure running in a remote environment. The calling (or caller) program becomes suspended after making the call and resumed upon receiving the results passed back from the called (or callee) program. Essentially, RPC offers a mechanism which enables a distributed application appearing as if the entire application resides locally. The employment of RPC simplifies the logical design and facilitates the implementation of a distributed application.
From a PRC’s point of view, LSA and LSAIso are two processes running in two separated environments and isolated from each other. When processing hash, LSA perform a RPC call to LSAIso, and waits for LSAIso to passed back the results to continue. Notice the secrets stored by LSAIso are protected with VBS and is not accessible to the rest of the operating system. In other words, “who” can call “whom” for “what” and “how” in this model are well defined. Credential Guard further enhances security by not allowing older variants of NTLM and Kerberos authentication protocols and cipher suites when using default derived credentials, including NTLMv1, MS-CHAPv2, and weaker Kerberos encryption types, such as DES.
Closing Thoughts
Credential Guard isolates and protects LSA secrets against PtH and PtT which have become popular “credential theft and reuse” attacks. Like many other Windows 10 security features, Credential Guard does have specific hardware, software and configuration requirements. IT need to start planning early since the hardware and the UEFI Secure Boot requirements may require a hardware upgrade, a disk layout change from BIOS to UEFI, an architecture change from x86 to x64, etc. The immediate task is to build inventories and assess business needs for Windows 10 security features, followed by planning hardware refresh and rolling out UEFI sooner than later.
Be Strategic, While Facing a Growing Trend of BYOD
By itself, Credential Guard secures hashes which is an important, yet just one component for protecting identity and defending malware. In Windows 10, a suite of security features are available including Devise Guard, Windows Hello, Microsoft Passport and combined with Enterprise Mobility Management (EMM) suite offering a new approach on device security from power on to off. Such that IT has the ability to manage not only on-premises devices, but also BYOD-based deployment via cloud. The key consideration is to make sure all management solutions are in convergence, and not end up with one solution for on-premises, one for cloud, and one for mobile.
EMM is a key enabler for authenticating users and enforcing device policies via cloud. It is a vehicle to embrace BYOD with minimal changes needed on existing on-premises infrastructure. For a sizeable company, some form of EMM solution is evitable facing raid adoption of mobility and BYOD. IT leadership needs to develop a roadmap for adopting EMM sooner than later, and start transforming into a “mobile first, cloud first” operation model as Microsoft so passionately advocates.
Call to Action
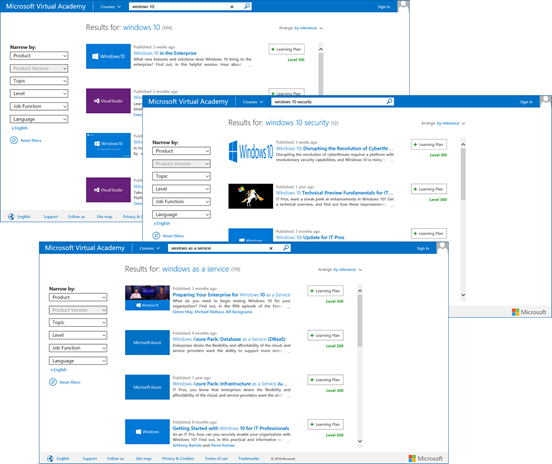
- Learn Windows 10 which Microsoft Virtual Academy offers self-paced and free online courses in all Microsoft products, technologies and solutions including Windows 10, security and “Windows as a Service” as shown below.
- Download Microsoft Deployment Tool Kit (MDT) and build inventories of your current IT establishment, if not already.
- Review Windows 10 editions and assess business needs for security features and the hardware/software/configuration requirements.
- Take advantage of your hardware refresh to roll out UEFI, sooner than later.
- Plan and execute your Windows 10 deployment.
An Introduction of UEFI Secure Boot and Disk Partitions in Windows 10
As a firmware interface standard to replace BIOS (Basic Input/Output System), UEFI (Unified Extensible Firmware Interface) specification has been a collective effort by UEFI Forum members for a while. UEFI is in essence an abstraction layer between firmware and OS, and independent of device hardware and architecture. Which provides flexibility for supporting multiple and various OS environments and as well acts as a generic target boot environment of drivers for cross-platform compatibility, as opposed to the need to develop a particular driver for particular hardware. With UEFI, there are also security opportunities to better defend a class of malware like bootkit and rootkit targeting the pre-boot environment of a device.
Why UEFI Secure Boot
Specifically, UEFI Secure Boot is an option to prevent a device from being tampered in a pre-boot environment, i.e. the period from power-on to initializing the OS. Malware injects itself in firmware or ROM, gains hardware access and is loaded before the OS, etc. make it difficult to defend or clean up, once a device is compromised. The Secure Boot option performs signature authentication upon executing code during pre-boot. A code/firmware creator is in this case required to digitally sign one’s code with a private key and to be verified against the paired public key upon loading at a device startup. Apparently, this process demands a signature database of supported hardware vendors established beforehand. Which explains why Microsoft, in fact since Windows 8, has instituted a driver signing process for certifying digital signatures of firmware for implementing UEFI Secure Boot and there are some changes of the process in Windows 10.
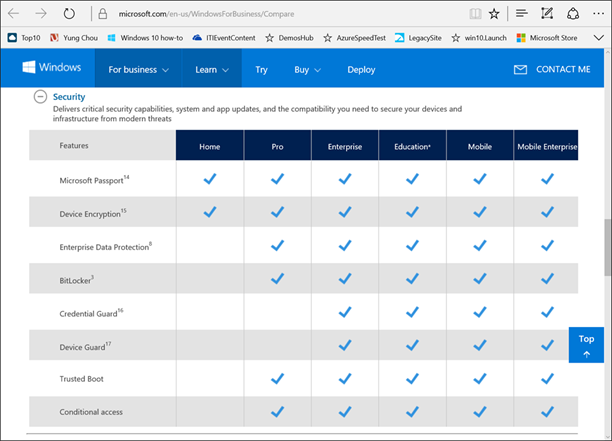
Above all, UEFI Secure Boot specification addresses security issues relevant to boot time exploits and eliminates the possibility for executing untrusted or altered code during pre-boot. And Windows 10 Enterprise supports UEFI 2.3.1 and later for Device Guard, a new and key security feature of Windows 10 Enterprise to ensure hardware and OS boot integrity of corporate devices. The following compares the security features of Windows 10 editions. Additional information of comparing Windows 10 editions based on Core Experience and Business Experience is readily available.
Sample Disk Layouts
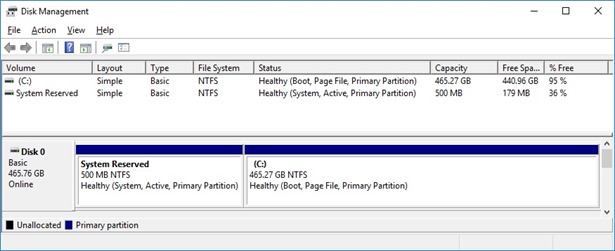
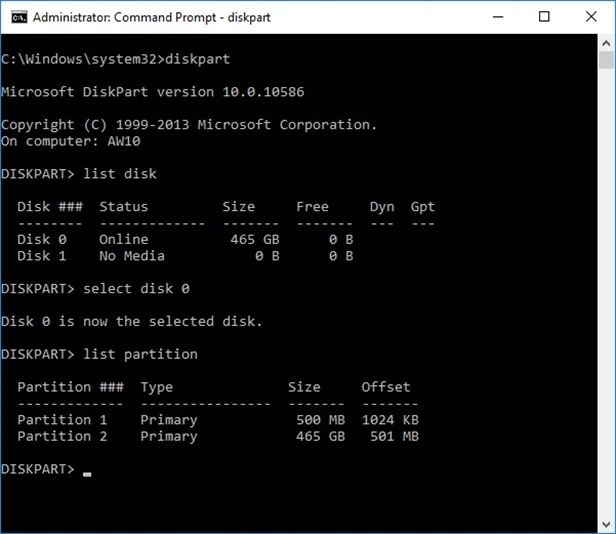
One easy way for an end user to verify if a device is UEFI-based is to examine the disk layout. Typically a BIOS-based device has two partitions, system and OS, on a primary disk where the OS is installed. A device based on UEFI has a vividly different disk layout from that of BIOS. The following details. The following are sample disk layouts of Windows 10 devices based on BIOS and UEFI as reported by Disk Manager and DISKPART command line utility.
Then BIOS
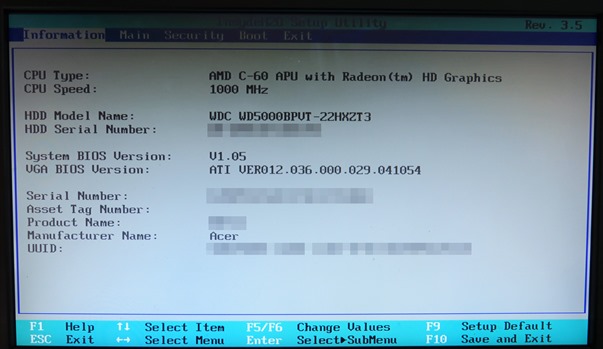
This is a sample BIOS setup screen of a Windows device.
And this is a typical disk layout of a device with BIOS, with System and an OS partitions, as reported by Windows desktop Disk Manager.
A DISKPART session as demonstrated below shows a disk layout consistent with what is reported by Disk Manager, with two partitions accordingly.
Now with UEFI
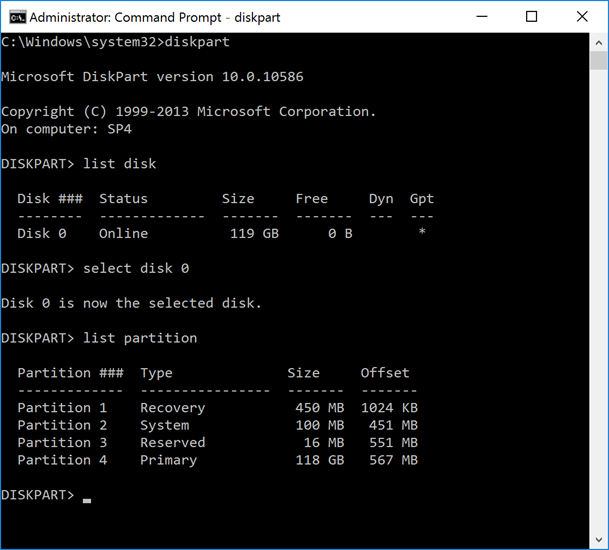
For UEFI, the following are two sample disk layouts. Notice that either one has an EFI System Partition, i.e. ESP. However, a DISKPART session reveals that there is actually an extra partition, the so-called Microsoft Reserved Partition, or MSR, which is:
- With no partition ID and not reported by Disk Manager
- Not for storing any user data
- Reserved for drive management of the local hard disk
The sizes of ESP and MSR are customizable. And based on business needs, additional partitions are to be added. Those involved in OS imaging and enterprise device deployment are encouraged to review and get familiar with the specifics of and Microsoft’s recommendations on configuring UEFI/GPT-based hard drive partitions, as detailed elsewhere.
Sample 1, A Typical Disk Layout with UEFI
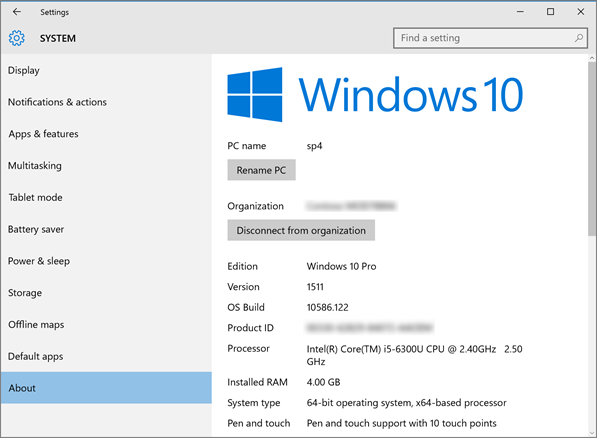
This is based on a Surface Pro 4 machine purchased from a retail store running Windows 10 Pro Build 10586, as shown.
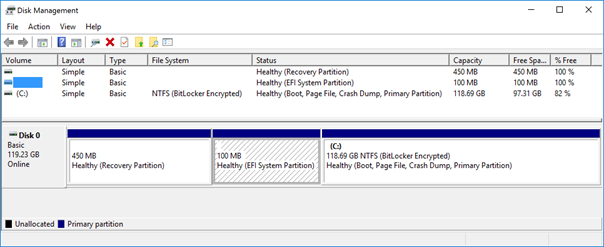
Disk Manager shows a three-partition disk with an ESP of 100 MB in size.
On the same device, a DISKPART session reveals that the disk also has a 16-MB MSR as Partition 3.
Sample 2, A Custom Disk Layout with UEFI
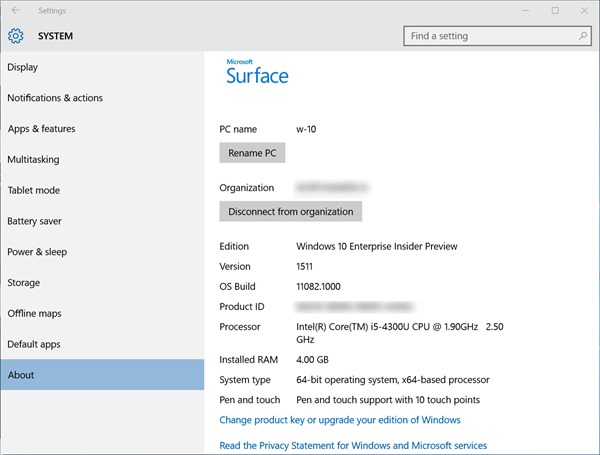
Below is a sample company-issued Surface Pro 3 device running Windows 10 Enterprise Insider Preview Build 11082.
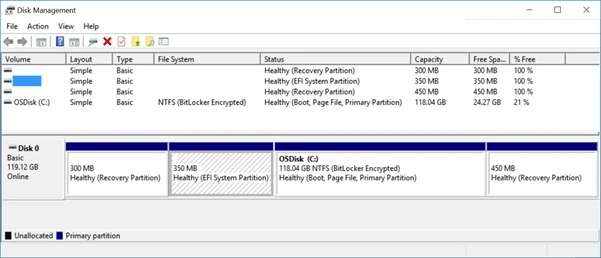
Here, Disk Manager presents a custom image with four partitions including a 350 MB ESP and a recovery partition after the OS partition.
And again, a DISKPART session reveals an 128 MB MSR as Partition 3.
UEFI and GPT
One thing worth point out is that when deploying Windows to an UEFI-based PC, one must format the hard drive that includes the Windows partition as a GUID Partition Table (GPT) file system. Additional drives may then use either the GPT or Master Boot Record (MBR) file format.
Manually Enabling Secure Boot
With UEFI already configured, here are manually ways to enable/configure secure boot with a Windows 10 device.
A Hardware Short-Cut with Surface Pro devices
There is a convenient way via hardware to change the boot settings of a Microsoft Surface Pro device. While the machine is power off, pressing the power button and the volume up button at the same time for a few (generally 5 to 10, some may take 20 or more) seconds will bring up the device boot setting screen. And if keeping holding the power and volume up buttons passing the boot setup screen for another few seconds, eventually this will trigger reloading the firmware in my experience.
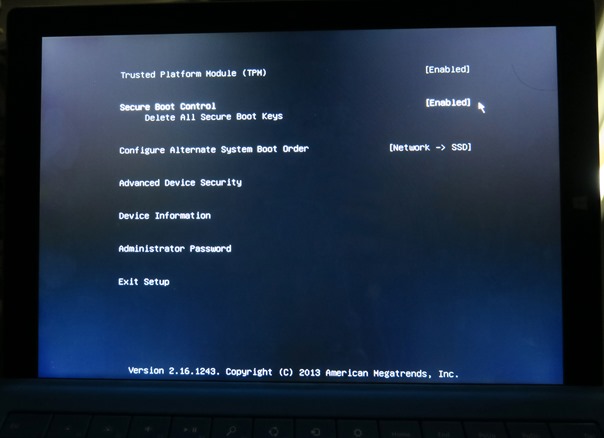
Here is the boot setup screen from the above mentioned Surface Pro 4 device running Windows 10 Pro, purchased from a retail store.
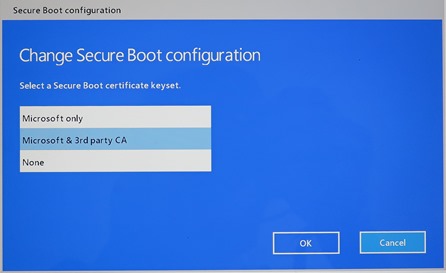
and with the secure boot options:
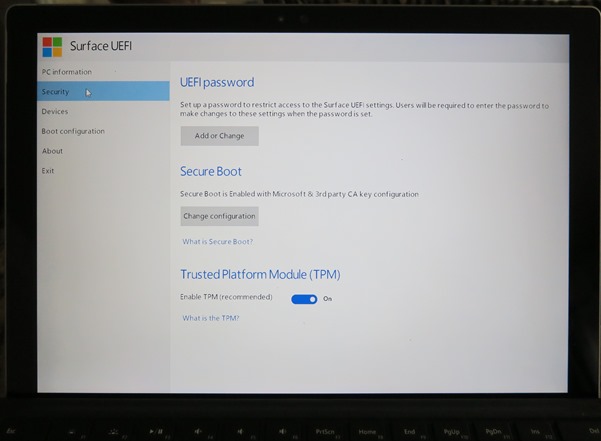
On the other hand, the following is a boot setup screen from a sample company-issued Surface Pro 3 device with a custom image built deployed with System Center Configuration Manager. The UI may appear different, and the available settings are most the same.
Changing UEFI or Boot Settings via UI
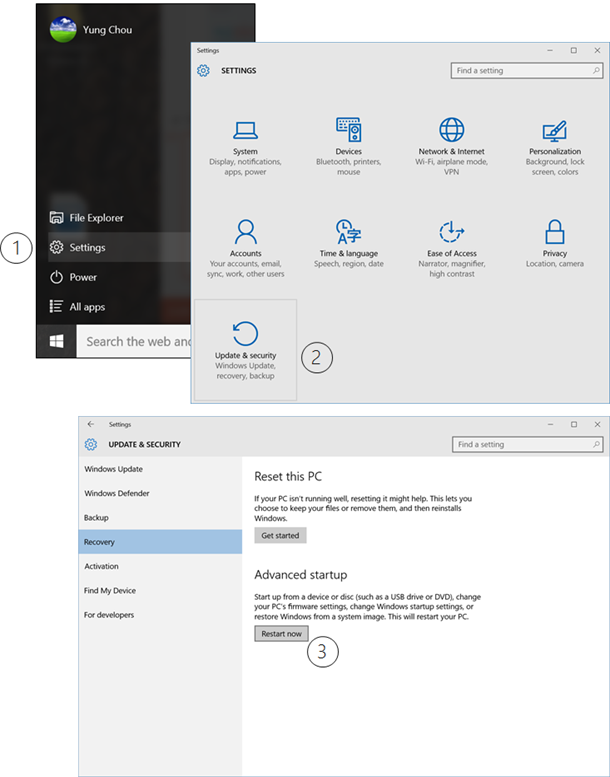
For a Windows 10 device based on UEFI, here is a visual presentation for demonstrating how to manually enable UEFI Secure Boot on Surface Pro 3 device running Windows 10 Enterprise Insider Preview Build 11082. The process begins by clicking Start/Settings from the desktop.
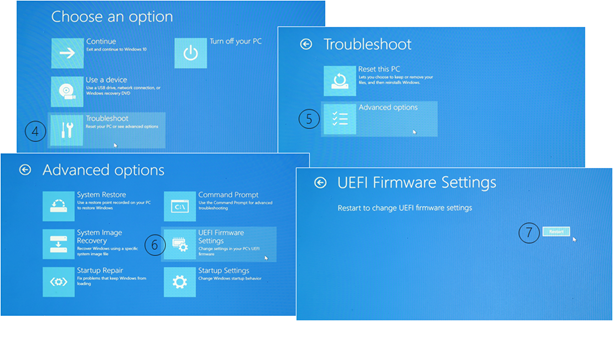
Upon the first restart, click the following screens as indicated.
And the second restart should bring up the boot setup screen shown earlier in this article. And again as mentioned, the process via UI can be short-cut by pressing the power and the volume up button at the same time for a few seconds, while a Surface Pro device is powered off.
Closing Thoughts
With on-going malware threats and a growing trend in adopting BYOD, IT must recognize the urgency to fundamentally secure corporate devices from power on to off. UEFI Secure Boot is an industry standard and a mechanism to ensure hardware integrity every time and all the time. There are specific hardware requirements and configurations must be first put in place for solutions relying on UEFI Secure Boot like Device Guard for Windows 10 Enterprise. Therefore, rolling out UEFI 2.3.1 or later and TPM 2.0 as well are important hardware components for IT to leverage hardware-based security features to fundamentally secure corporate devices.
#Windows 10: Usability and Ease of Access by @yungchou and @jkc137 in @TechNetRadio
My colleague, Jennelle Crothers, and I got a chance to chat about the usability and ease of use in this episode of Windows 10 series in TechNet Radio. She’s great and we had much fun doing it. Jennelle did a quick demo on how to make Windows 10 even easier to use.
(Part 2) Deploying Windows 10: How to Migrate Users and User Data to Windows 10
Yung Chou, Kevin Remde and Dan Stolts continue their TechNet Radio multi-part Windows 10 series and in part 2 they showcase free tools like the User State Migration Toolkit (USMT) that can easily migrate users and user data to Windows 10 from Windows XP, 7 and 8.
(Part 1) Deploying Windows 10: Deployment and Servicing Options
Yung Chou, Kevin Remde and Dan Stolts kick off a new multi-part Windows 10 series today and in Part 1 they discuss the many ways in which you can deploy, upgrade and manage Windows 10 in your Enterprise IT environment.


